- DSI CLEAR
- Theory & Practice
- Accessibility Online
- Keyboard Navigation
- Headings, Lists & Tables
- Text Formatting & Links
- Images & Alt Text
- Shapes, Texture, & Color Contrast
- Saving Accessible PDFs from Microsoft Office
- Checking & Fixing PDFs for Accessibility
- Fillable PDF Forms
- Audio & Video Captioning
- Publisher & Third Party Content Accessibility Tips
- Content Language Accessibility
- STEM Accessibility
- Music Accessibility
- Glossary of Accessibility Terms
- Compliance Checklist
- SensusAccess
- Copyright Guide
- Online Teaching
- UNT Syllabus Template
- Teaching Consultation Request
Images & Alternate Text
 For images of any kind, the primary concern is their accessibility to people with
low vision. If an image is decorative -- meaning, it is not part of the instruction -- we recommend marking the image as
decorative (the method to do so is unique to each application and we will explain
in detail below). By marking an image as decorative, screen reader applications will
skip over the images entirely when vocalizing the content of the page.
If an image is informational, useful or critical to a student's understanding of the course material, or it includes material that a student will be assessed on, a textual description must be included with the image. This is most commonly included as a "alt text" description, the implementation of which we will also elaborate on below. Please note that the image file name never serves as a meaningful alt text description. An example of good alt text is "A beachfront bungalow surrounded by trees". An example of bad alt text is "beachfront_bungalow1.jpg".
For complex images (e.g., graphs, charts, data visualizations, etc.), we recommend inclusion of brief alt text description, plus a longer, detailed textual description of the image in paragraph form directly above the image, as part of your content.
The rest of this page contains guidance for creating and modifying image content so that it is optimally accessible. To jump to a specific section of this page, please click one of the menu items below.
Contents
Canvas
Upload an Accessible Image to Canvas
We'll begin first with the basic process of uploading an image. To start, begin by editing your Canvas page, and then clicking the "Embed Image" button in the rich text editor toolbar:

A new pop-up window will appear. Select the "Choose an Image" button (1) toward the top of that small window. This will display a standard file selection window. Browse to the folder containing your image, select it, and then select the "Open" button. Back in Canvas, your image will appear in the center of the pop-up window. Select the white "Select All" button just below the image (2), or crop your selection, if you wish by clicking and dragging the corner anchors of the blue selection box. Make any other adjustments you feel are necessary, and when you are finished, select the "Crop & Resize Image" button (3).
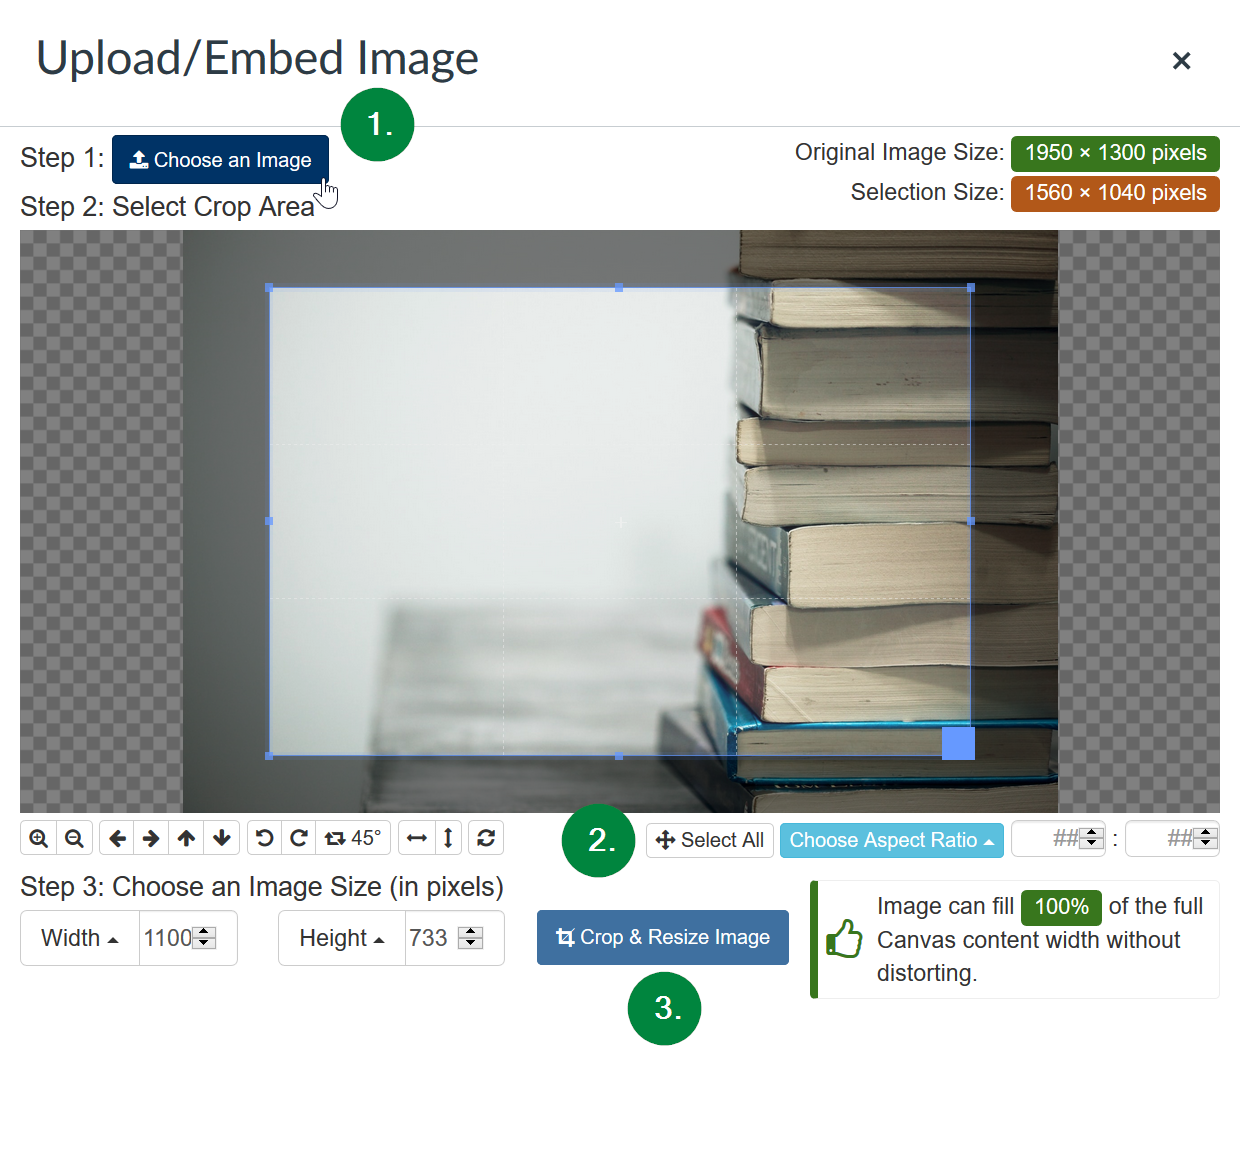
To complete the task of inserting an image in your web page, select the "Upload and Embed" button at the bottom right corner of the pop-up window (4).
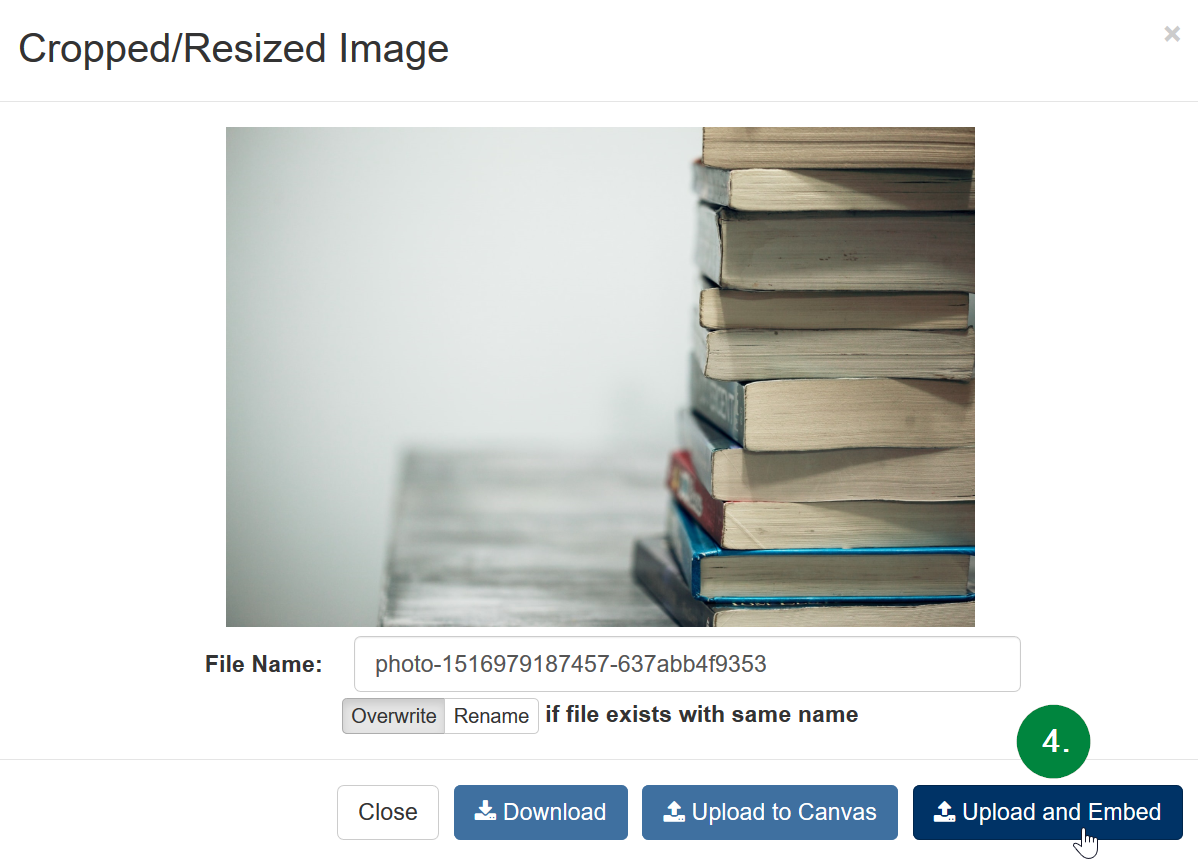
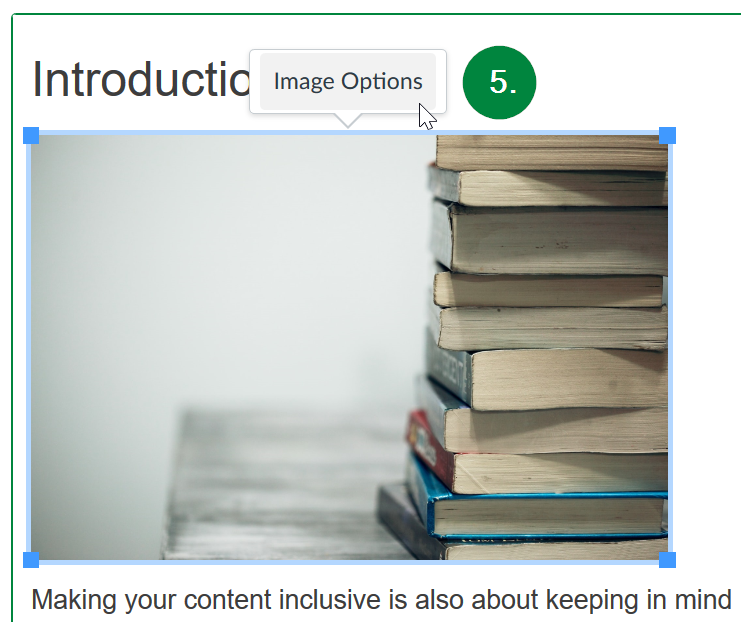
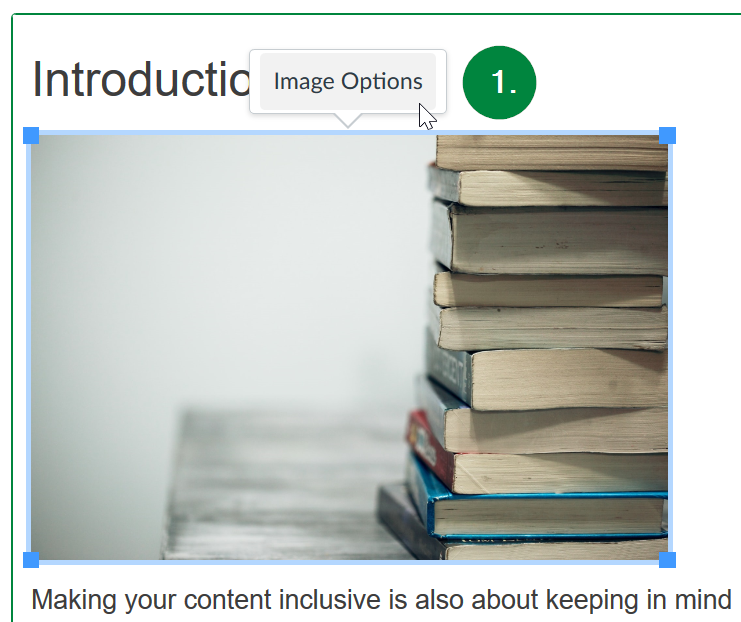
Now, we want to modify the image options in order to add our alternate text. Select the image in the rich text editor window. This should display an "Image Options" pop-up menu option (5). Please select that option.
![]() Alternate Text is best written as a brief descriptive sentence or two. File names, however descriptive,
are not appropriate, as they frequently contain special characters and sometimes lack
spacing between words, so a screen reader application may fail to correctly read the
information. Likewise, long descriptions (paragraph length) are also not ideal.
If your image requires a long description, it is best to include it in the body of
your web page or document either directly above or below the image.
Alternate Text is best written as a brief descriptive sentence or two. File names, however descriptive,
are not appropriate, as they frequently contain special characters and sometimes lack
spacing between words, so a screen reader application may fail to correctly read the
information. Likewise, long descriptions (paragraph length) are also not ideal.
If your image requires a long description, it is best to include it in the body of
your web page or document either directly above or below the image.
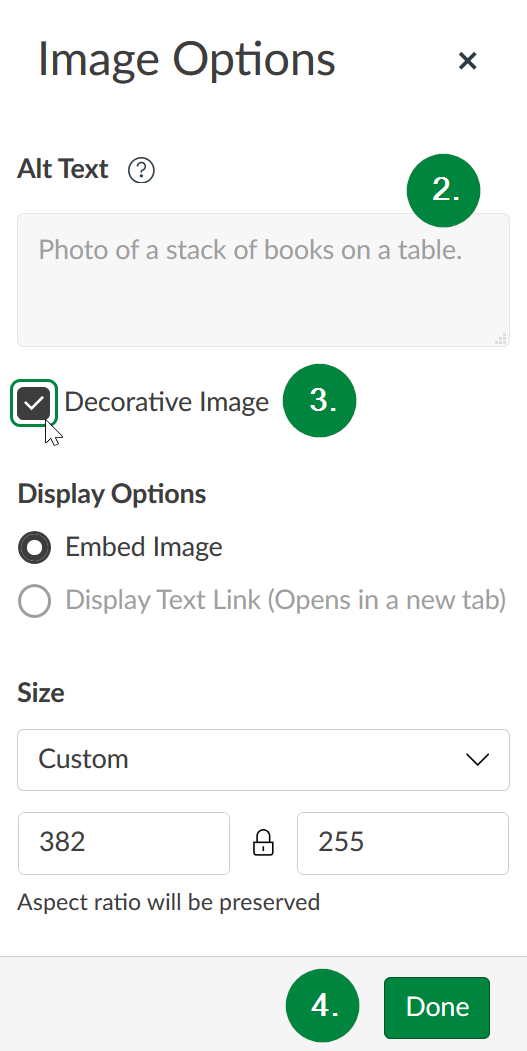
This will open the Image Options menu on the right side of your browser window. Here, you have the option to enter in your alt text (6) or identify the image as purely decorative by selecting the checkbox marked "Decorative Image" (7). Choose one or the other. If the image is marked as decorative, a screen reader will bypass it entirely. When you are done modifying your image options, select the "Done" button (8) at the bottom of the menu.
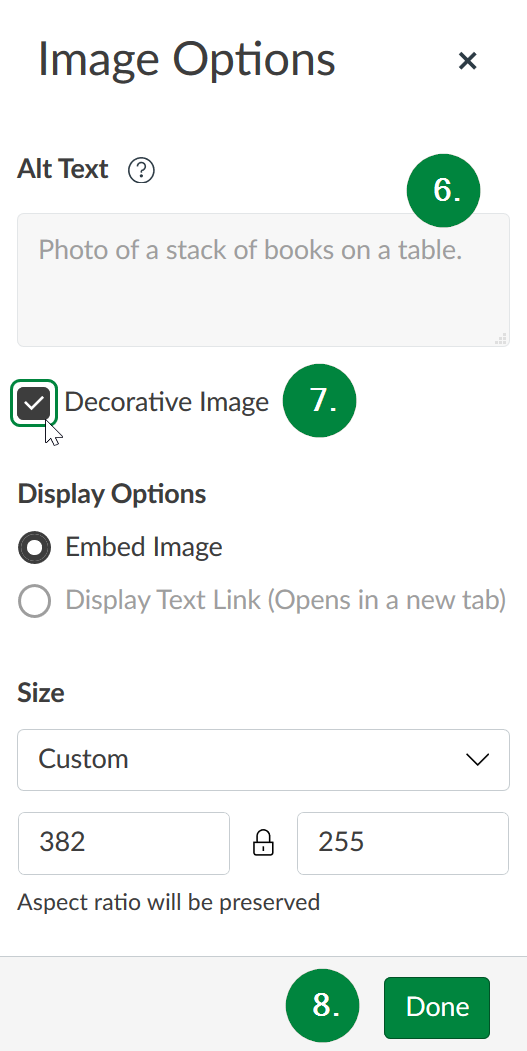
Congratulations! Your uploaded image is now accessible to a screen reader!
Make an Existing Image in Canvas Accessible
If you wish to remediate an image you have already uploaded, first select the image in the rich text editor window. This should display an "Image Options" pop-up menu option (1). Please select that option.
This will open the image properties window, which is identical to the one displayed upon first uploading an image. Here, we recommend you either (1) enter a brief description of the image into the "Alt text" textbox, if the image is a useful or necessary part of the instruction, or (2) check the "Decorative Image" checkbox, if the image is purely ornamental.
![]() Alternate Text is best written as a brief descriptive sentence or two. File names, however descriptive,
are not appropriate, as they frequently contain special characters and sometimes lack
spacing between words, so a screen reader application may fail to correctly read the
information. Likewise, long descriptions (paragraph length) are also not ideal.
If your image requires a long description, it is best to include it in the body of
your web page or document either directly above or below the image.
Alternate Text is best written as a brief descriptive sentence or two. File names, however descriptive,
are not appropriate, as they frequently contain special characters and sometimes lack
spacing between words, so a screen reader application may fail to correctly read the
information. Likewise, long descriptions (paragraph length) are also not ideal.
If your image requires a long description, it is best to include it in the body of
your web page or document either directly above or below the image.
This will open the Image Options menu on the right side of your browser window. Here, you have the option to enter in your alt text (2) or identify the image as purely decorative by selecting the checkbox marked "Decorative Image" (3). Choose one or the other. If the image is marked as decorative, a screen reader will bypass it entirely. When you are done modifying your image options, select the "Done" button (4) at the bottom of the menu.
Congratulations! Your image is now accessible!
Microsoft Office (Word, PowerPoint, Excel, etc.)
Insert an Accessible Image in Office
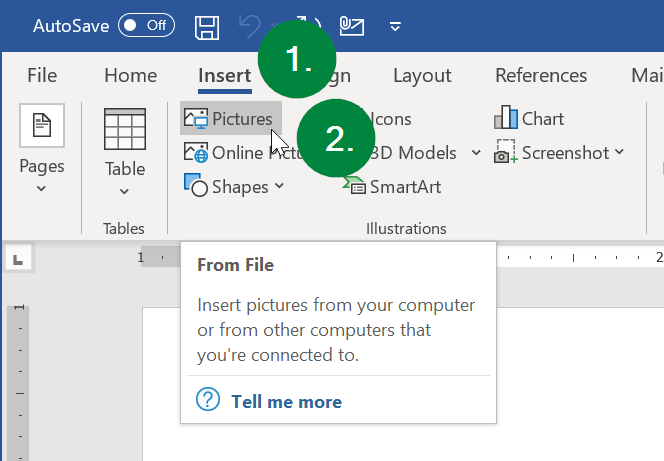
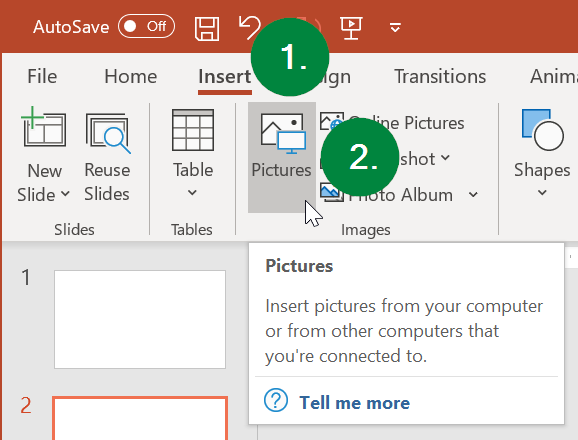
We'll begin first with the basic process of inserting an image into your document or presentation. The process is the same for Microsoft Word and PowerPoint. Start by clicking in your document/presentation so that the blinking cursor appears in the place you wish to insert the image. Select "Insert" from the ribbon menu at the top of your Office Application (1), and then select the "Pictures" button directly below (2).
For Microsoft Excel, there is an extra step. Start by selecting the cell in your spreadsheet into which you wish to insert an image. Next, (1) select "Insert" from the ribbon menu at the top of your Office Application. Then, (2) select "Illustrations" from the menu, followed by the "Pictures" button directly below.
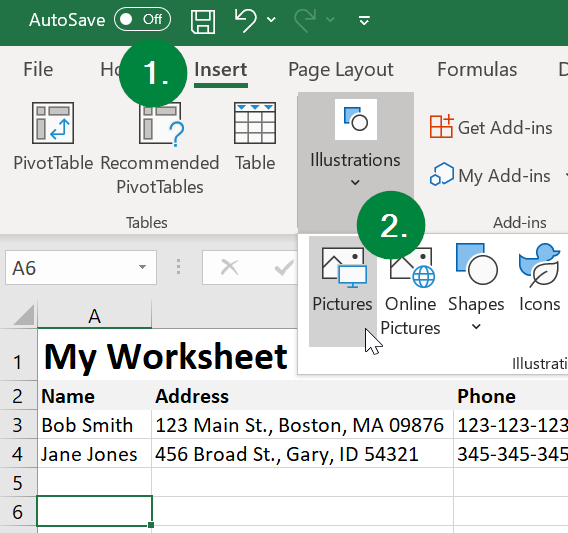
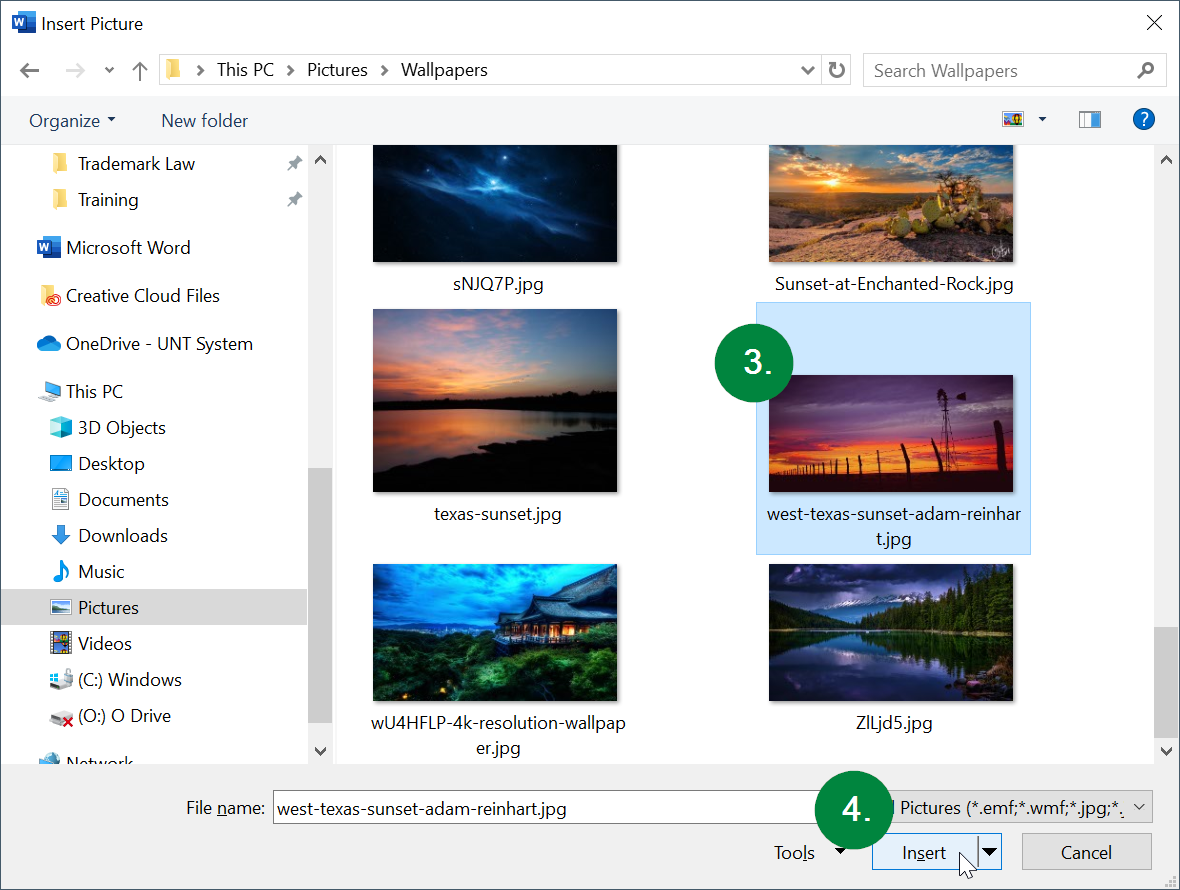
The remaining steps are identical across Microsoft Word, PowerPoint, and Excel. Browse to the folder containing the image you wish to insert, select it (3), and then select the "Insert" button at the bottom of the window (4):
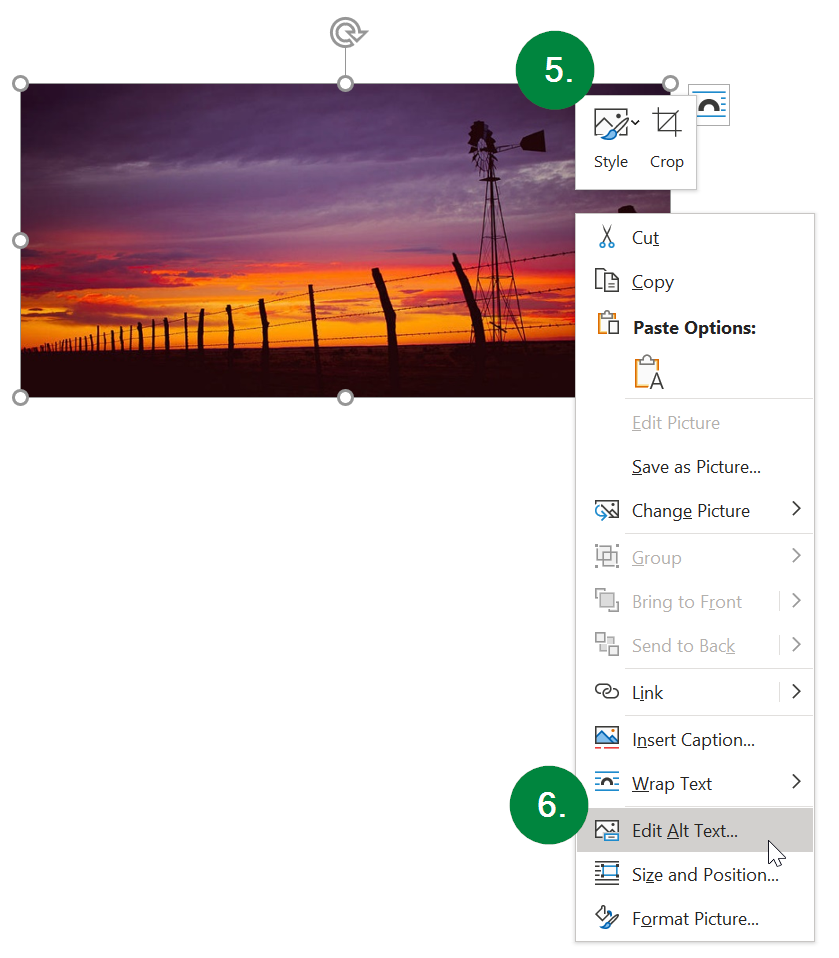
Next, right-click the image, or open this context menu by the means available to you (5), and select "Edit Alt Text..." from the menu (6).
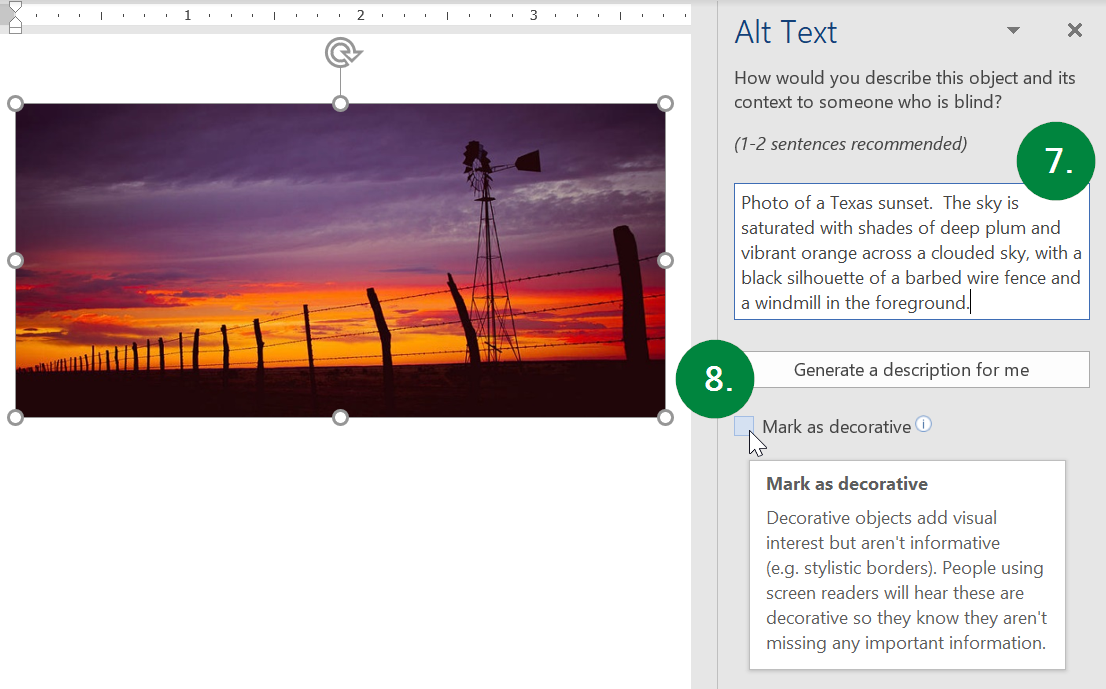
This will open the Alt Text pane on the right side of the window, as pictured below. From here, we recommend either (7) entering a brief description of the image into the textbox in the Alt Text pane, if the image is a useful or necessary part of the instruction, or (8) check the "Mark as decorative" checkbox, if the image is purely ornamental. When you are finished applying your accessibility settings, you may click the "X" in top right corner of the Alt Text pane to close it.
![]() Alternate Text is best written as a brief descriptive sentence or two. File names, however descriptive,
are not appropriate, as they frequently contain special characters and sometimes lack
spacing between words, so a screen reader application may fail to correctly read the
information. Likewise, long descriptions (paragraph length) are also not ideal.
If your image requires a long description, it is best to include it in the body of
your web page or document either directly above or below the image.
Alternate Text is best written as a brief descriptive sentence or two. File names, however descriptive,
are not appropriate, as they frequently contain special characters and sometimes lack
spacing between words, so a screen reader application may fail to correctly read the
information. Likewise, long descriptions (paragraph length) are also not ideal.
If your image requires a long description, it is best to include it in the body of
your web page or document either directly above or below the image.
Also, please note that every image, no matter how small and seemingly insignificant, either needs to be marked as "decorative," or needs explanatory alternate text. This includes graphical lines, boxes, and all other graphical design elements.
Congratulations! You have inserted an accessible image in Microsoft Office!
Make an Existing Image in Office Accessible
Right-click the exiting image in your document/presentation/spreadsheet, or open this "right-click" context menu by whatever means are available to you (1). Then, select "Edit Alt Text..." from the menu (2).
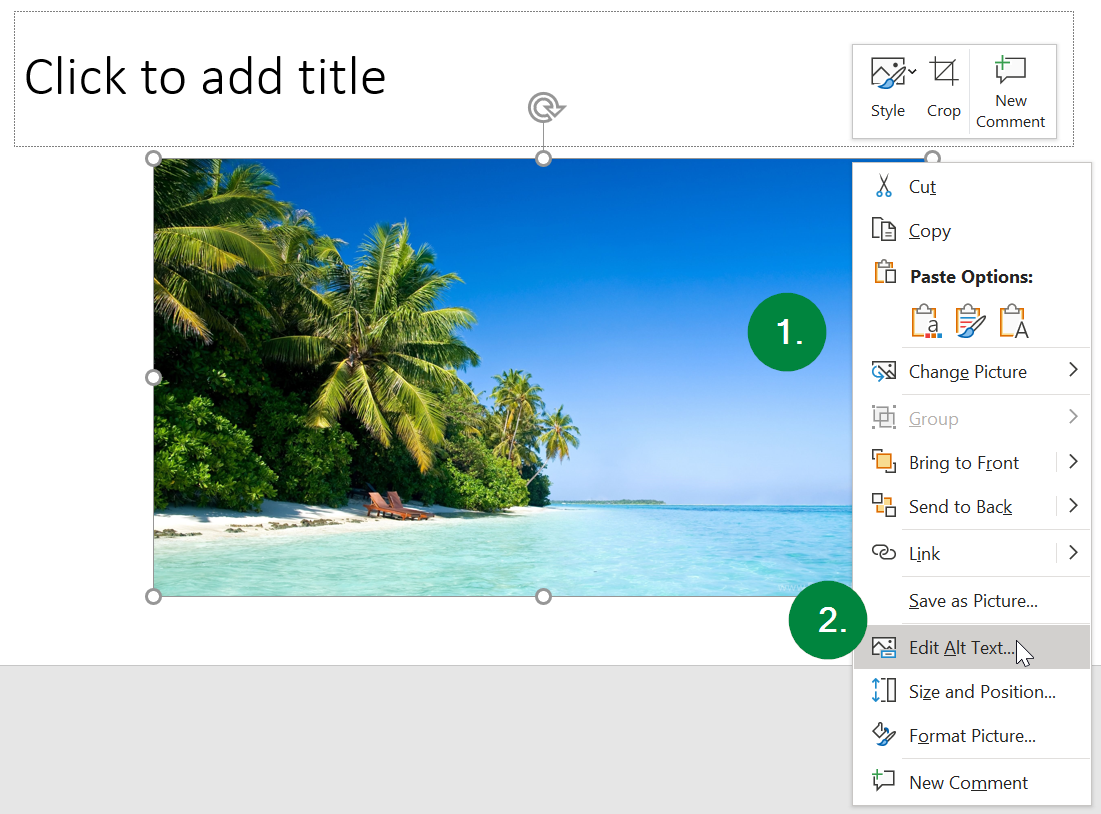
This will open the Alt Text pane on the right side of the window, as pictured below. From here, we recommend either (3) entering a brief description of the image into the textbox in the Alt Text pane, if the image is a useful or necessary part of the instruction, or (4) check the "Mark as decorative" checkbox, if the image is purely ornamental.
![]() Alternate Text is best written as a brief descriptive sentence or two. File names, however descriptive,
are not appropriate, as they frequently contain special characters and sometimes lack
spacing between words, so a screen reader application may fail to correctly read the
information. Likewise, long descriptions (paragraph length) are also not ideal.
If your image requires a long description, it is best to include it in the body of
your web page or document either directly above or below the image.
Alternate Text is best written as a brief descriptive sentence or two. File names, however descriptive,
are not appropriate, as they frequently contain special characters and sometimes lack
spacing between words, so a screen reader application may fail to correctly read the
information. Likewise, long descriptions (paragraph length) are also not ideal.
If your image requires a long description, it is best to include it in the body of
your web page or document either directly above or below the image.
When you are finished applying your accessibility settings, you may click the "X" in top right corner of the Alt Text pane to close it.
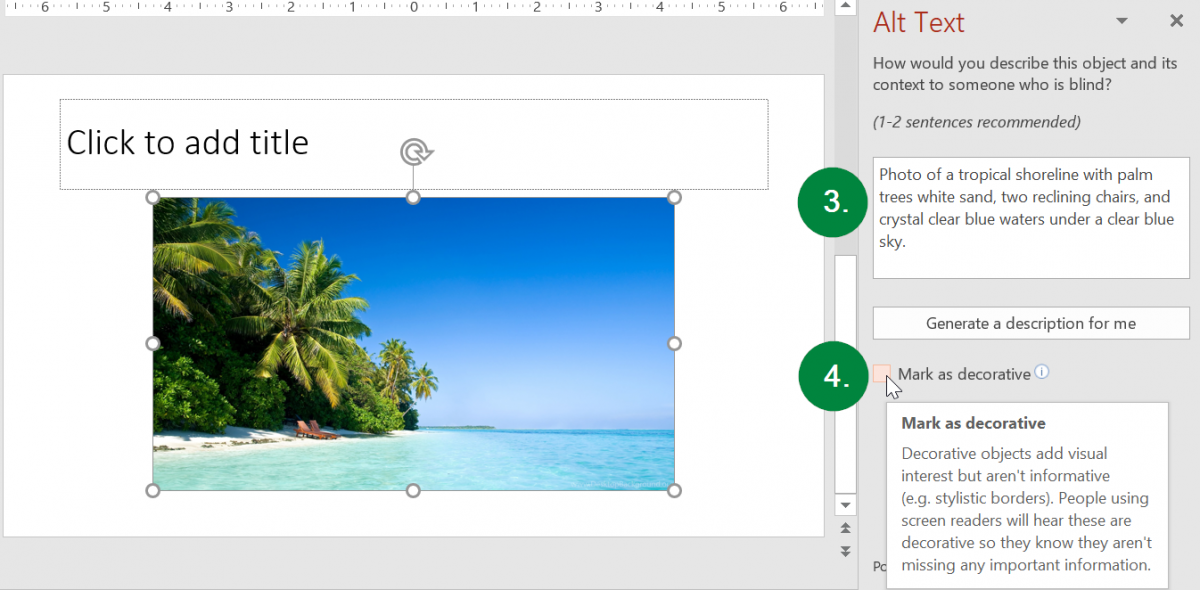
Congratulations! You have made your image in Microsoft Office accessible!
Adobe Acrobat PDF
Guidance for adding alternate text to images ("figures") in Adobe Acrobat can be found at our Fixing Image Alternate Text section of our Checking & Fixing PDFs in Adobe Acrobat page.
Complex Graphs or Charts
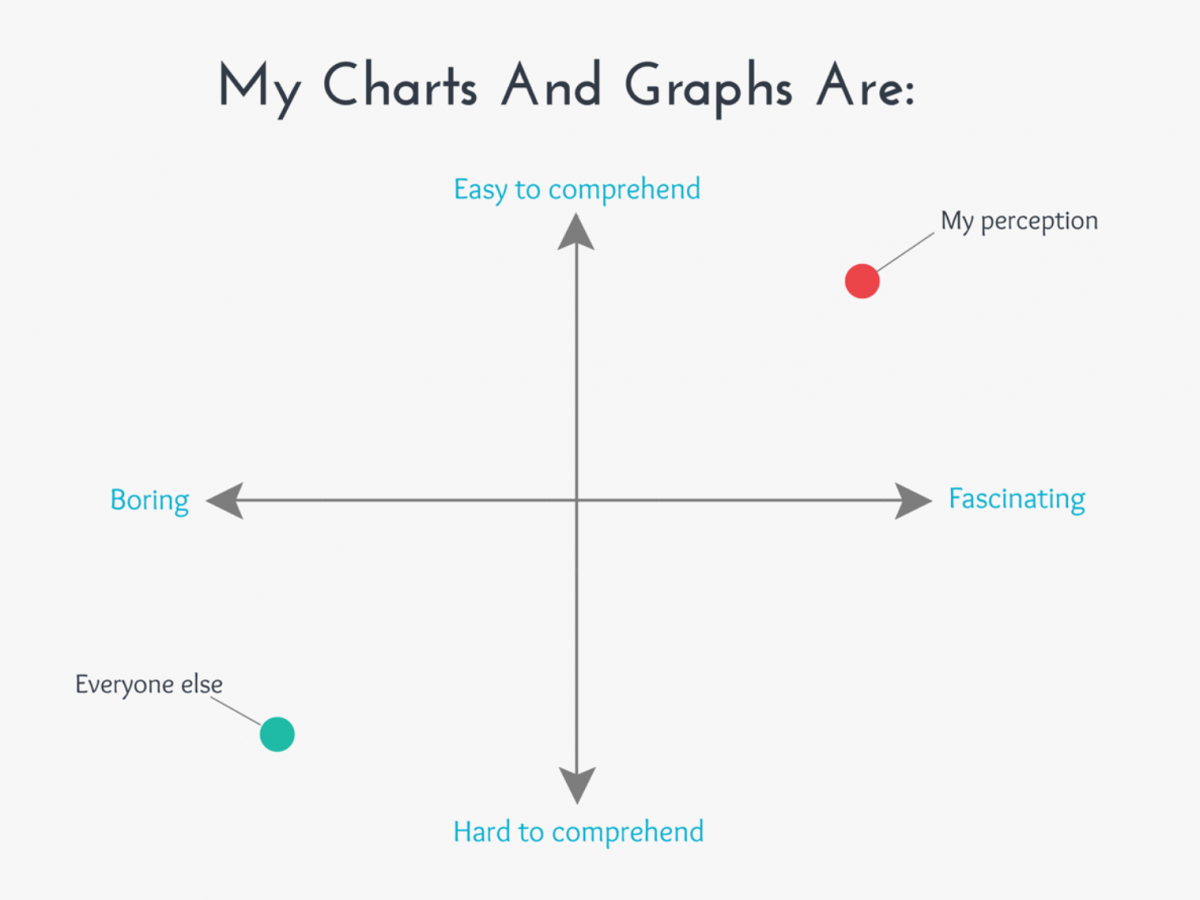
Complicated graphs, charts, and other images will require more information than a brief description that is suitable for Alt Text. The best practice in these cases is to provide both a brief Alt Text description, e.g., "An XY chart about the unemployment rate in the United States", plus a detailed textual description of the graph before it appears on the page. An example of this is below:
The graph below is a XY Chart, entitled "My Charts and Graphs Are." The chart contains a left-to-right "X" axis and an up-to-down "Y" axis, which intersect one another at the center, forming a cross. At the left of the X axis is the word "Boring," and at the right is the word "Fascinating," representing opposites, with the space in-between representing gradients between these two polar opposite perceptions or moods. The top of the "Y" axis is labeled "Easy to comprehend," and the bottom of the axis is labeled "Hard to comprehend." Toward the top right of the graph, at the point representing a strong combination of "Easy to Comprehend" and "Fascinating" is a plotted red dot labeled "My perception." At the bottom left corner, representing a strong combination of "Boring" and "Hard to comprehend," is a second plotted dot in green labeled "Everyone else."
Source: TowardsDataScience.com, by Payman Taei