Fillable PDF Forms
Introduction

In situations where an HTML web form is not available or cannot be used, you may consider creating a fillable PDF form. The main advantage of using a fillable PDF form is that they work well on computers, devices with larger displays, and are designed in a way that is familiar and predictable for sighted individuals. When designing fillable PDF forms for accessibility however, some additional considerations and steps need to be taken before they can be easily navigated and completed by those with accessibility needs.
This guide is designed for those with some level of familiarity creating or remediating accessible PDFs and are working with a source document that with the exception of the fillable form section, is considered to be accessible. If you are unfamiliar with accessible static PDFs, please visit the DSI CLEAR PDF Accessibility Guide or the WebAIM Creating Accessible Forms Guide for additional information.
Prerequisites
Before work can begin on creating an accessible PDF form, the following prerequisites are required:
- Creating a web version of the source document is not possible or feasible
- A source PDF that is accessible (correctly tagged, alt text, title/language properties
set, etc.) with the exception of the form fields
- Note: Your source file may also be a Microsoft Word document that has not yet been converted to PDF. If this is the case, verify that visually the form fields in your Word Document are how you would like them to appear in the final PDF. Be advised that when converting from Word to PDF, you'll likely need to immediately run the accessibility checker in Adobe Acrobat Pro DC again; even if your Word document did not have any accessibility issues. This guide assumes that an accessible PDF has already been created and that the only remaining work on the file is the fillable forms.
- A working knowledge of PDF accessibility and remediation measures
- Adobe Acrobat Pro DC (in this guide we will be using Version 2022.002.20191)
Instructions
Form Setup
Open source document in Adobe Acrobat Pro DC.
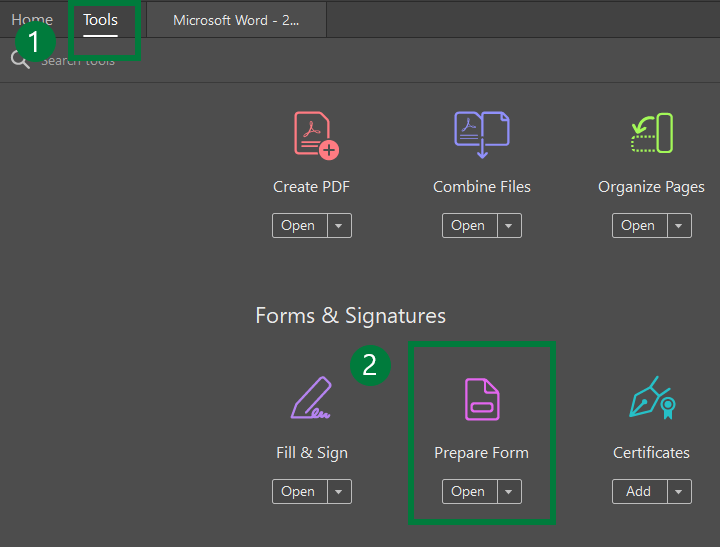
Go to the (1) Tools tab and in the Forms & Signatures section, click on (2) Prepare Form.
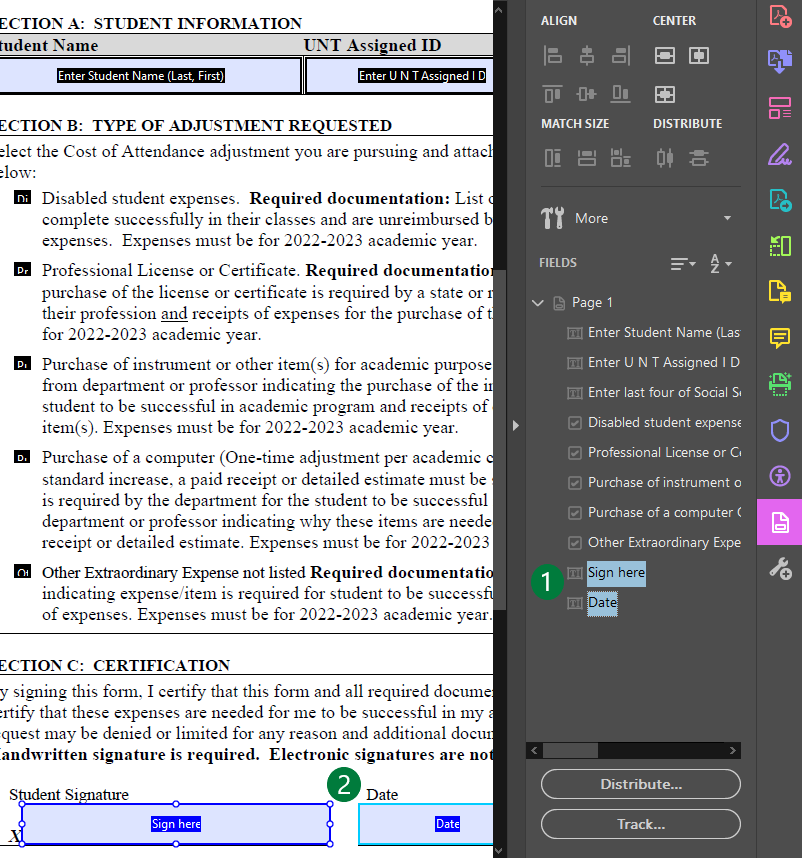
After clicking on the Prepare Form button in the previous step, Acrobat should automatically take you back to the main document view. In the main document view, the Prepare Form tools menu should visible. If not, you may need to click on the (1) expand button. The expand button can also be used to hide the Prepare Form tools menu if you need a wider view when not working on creating a form. Notice that Acrobat will automatically detect form fields based on the visual design of the source document.
![]()
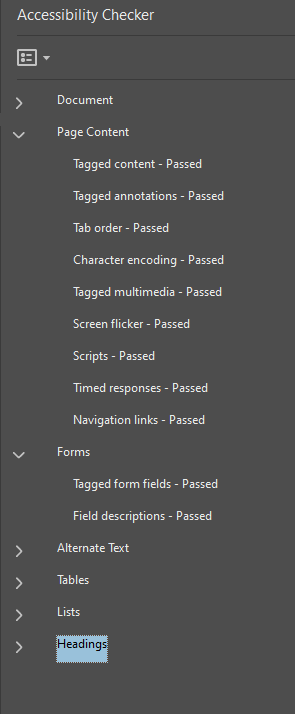
Form Validation and Manual Check
As with all automated tools, a manual check of the results will be required. Verify the following:
- All fields have been identified. If any fields have not been identified, use the Prepare
Form toolbar located above the main document viewing area in Acrobat and add the form
fields that were not identified. There are 10 different form fields including text
fields, digital signature, and dates.
Fillable PDF Design Notes: Although checkboxes and radio buttons may seem similar, check boxes should be used when multiple options (e.g "Mark all that apply") can be selected simultaneously while radio buttons should be used when only one option can be selected (e.g. "Select one of the following:"). Although buttons are generally accessible, they do not function outside of Acrobat products or web PDF applications so be mindful when using this option.
- All identified fields are the correct type. For any fields that were identified but
not the correct field type, you can delete them by clicking on them in the (1) Fields Submenu of the Prepare Form tools menu on the right side of Acrobat and pressing delete or by right-clicking and selecting
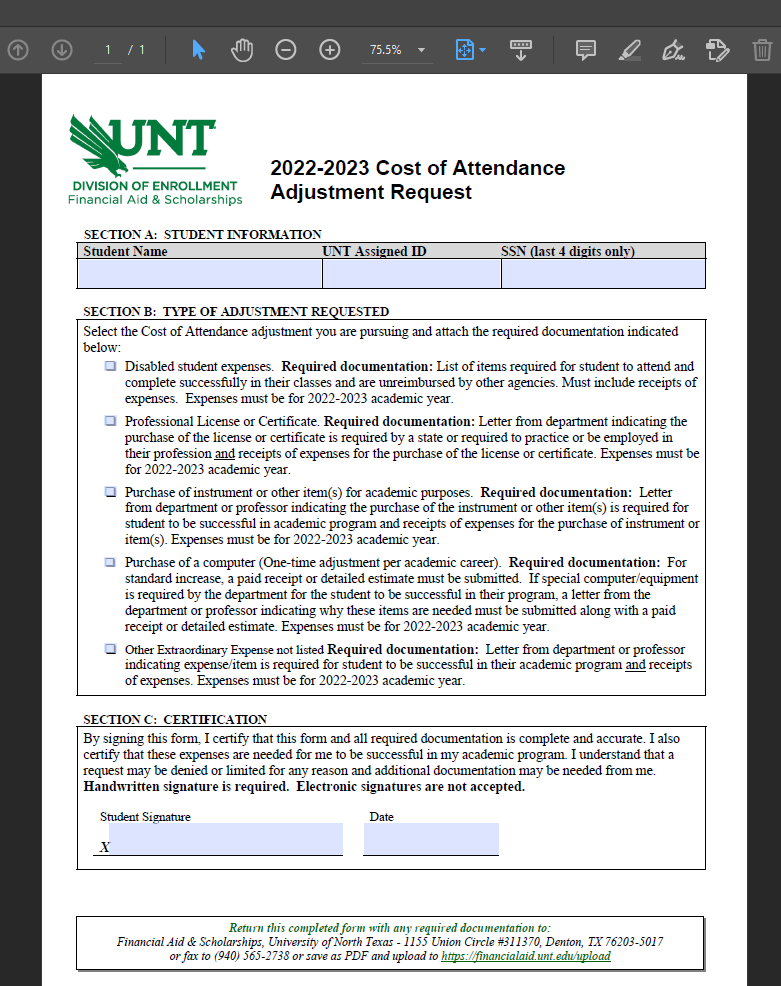
delete. In this example source document, the (2) Student Signature and Date fields were identified but were not of the correct type. After deleting the field in question,
use the Prepare Form toolbar as described above.
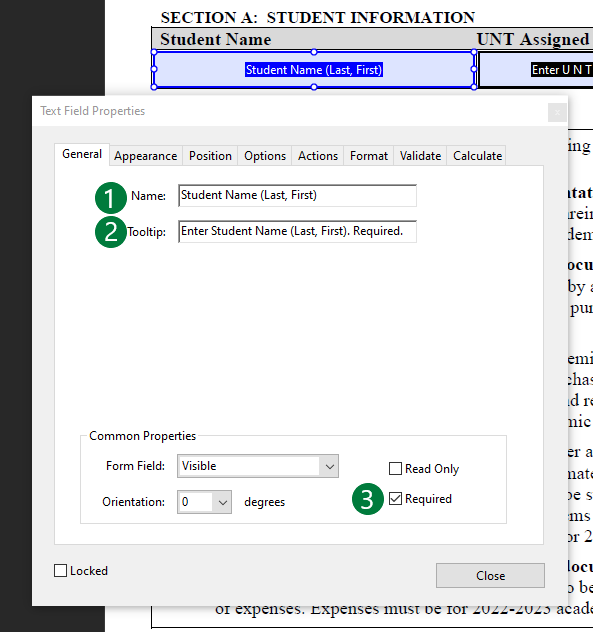
- Name and Tooltip in the Text Field Properties menu are correct. To edit the name and the tool tip, right click the applicable field in
the Prepare Form tools menu on the right side of Acrobat and select Properties. (2) Tooltips are what will be read to anyone using a screen reader so make sure that adequate information
or instruction is provided. The (1) name field should be used to describe the form field for tagging and editing purposes. The information
provided in the name field will not be visible outside of the editing process and will not be read by a screen
reader program. Note: When marking a field (3) required, it is possible that a screen reader may not relay this information so it is recommended
to also annotate that a field is required in the tooltip field.
Accessibility Cleanup
After the overall structure and layout of the fillable PDF is complete, form field tab order and tags should be the only remaining items to address for accessibility if done correctly. For reference, here is the example source document after completing the form fields but before the new accessibility issues have been addressed.
To view and modify the field tab order, click on (1) hamburger menu (three tapered horizontal lines) in the Fields submenu of the Prepare Form tools menu and select Show Tab Numbers.

The tab number order will reflect the order listed in the Fields submenu (and little
numbers should appear in the top left corner of each field). The numbers in the top
left corner of each field should match the visual reading. If anything is out out
of order, you may reorder the items in the Fields submenu by dragging and dropping
the item into the correct place. If a new tag is created, it will be placed at the
bottom of the reading order list (last) and it will need to be reordered accordingly.

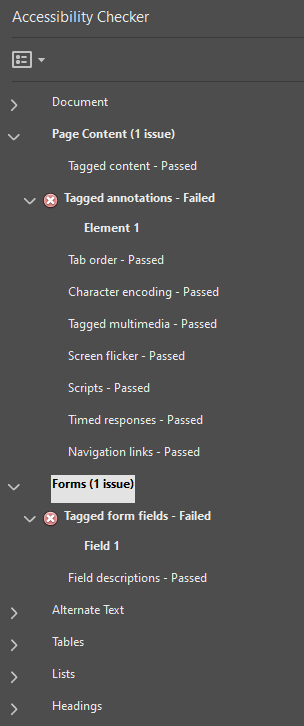
At this point, updating tags will follow the normal procedures listed in the DSI-CLEAR PDF Accessibility Guide and will vary according to your own document. In the case of the example source document, remediating the two outstanding issues will require the use of the (1) Find tool in the Tags Menu.
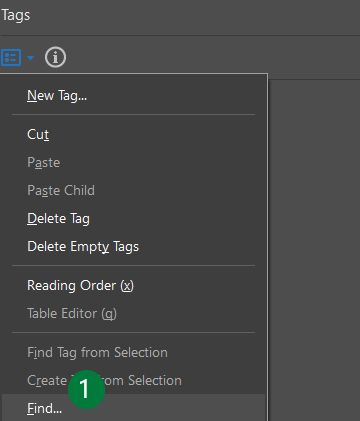
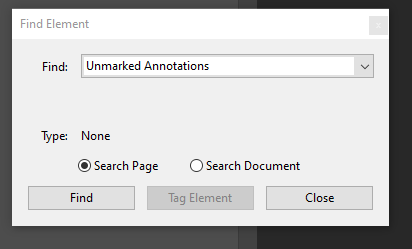
In the example source document, the Find tool will be used to fix the Tagged Annotations and Tagged Form Fields problem. In the tags menu, select find as shown above and the Find Element window will appear. In the drop down menu, select Unmarked Annotations and then click Find. Any elements that are unmarked will be highlighted and for each element highlighted select Tag Element. The Tag Element Window will then allow you to tag any unmarked annotations using a variety of different choices, but for this example the unmarked annotations should be tagged as Forms.
Congratulations! Your fillable form is now accessible!