Checking Images for Infringement
The second most common issue we encounter in online courses is the accidental use of unlicensed commercial ‘stock’ images. The examples below are a good example. The first image, on the left, is of a commercial stock photo, being sold by Adobe Stock online.
The second image, on the right, is supposedly an open access image, on Wikimedia Commons, and licensed under the Creative Commons. Do you notice the similarities between the two? Can you identify the single difference between the two? Do you think a court would deem the second work on Wikimedia as unique from the first? Or is it a derivative work? In all likelihood it is a derivative work of the first and a likely copyright infringement of the owner of the Adobe Stock image. But how do we trace images, figure out where they come from, and whether they ae safe to use? Reverse image search is the answer!


PowerPoint Slideshow Images
Before we start reverse image searching, let’s first cover an important topic: gaining access to all the images in a PowerPoint slideshow. A great deal of PowerPoint slideshow files contain only a few images. In this case, one can select each image in each slide, right-click them, and select “Save as Picture” to download them one-at-a-time. However, some course slideshows can contain upwards of a hundred slides, and as many or more images. That is when the one-at-a-time process becomes too time-consuming. Fortunately, there is a fairly simple solution.
First, open File Explorer and browse to the folder on your computer which contains the slideshow file. In order for this process to work, the slideshow must be saved in PPTX file format. If you cannot see the file extension in File Explorer, turn on that option. If your file is in the PPT format says, open the file in PowerPoint, select “Save As” and change the file type to PPTX. Once you have your file saved in the PPTX format, then:
- Select the file in File Explorer, right-click it, and select “Copy.”
- Right-click in a neutral area of the same folder and select “Paste” to make a duplicate of the PPTX file. The name of the copy of the file will end in the word “Copy.”
- Right-click the duplicate file and select “Rename.”
- Change the file extension from “.pptx” to “.zip” and press Enter to save.
- Windows will warn you about changing the file extension. Agree to the change.
- Double-click the new ZIP file to open it in File Explorer.
- Find and double-click the “ppt” folder to open it.
- Find and right-click the “media” folder, then select “Copy.”
- Click the back arrow in File Explorer until you are back in the folder containing the PPTX and ZIP file.
- Right-click in a neutral area of the folder and select “Paste.”
- Right-click the “media” folder and select “Rename.” Give it a name that reflects which PowerPoint slide it is associated with. Most courses have a series of slides, numbered by module or week. In this case, a good option is to name the folder after the number of the week.
- Double-click the folder to open it. You should now see a list of every image file that was in the PowerPoint slide. This will save you the time and energy of extracting each image one at a time. And will make click-and-dragging the images into TinEye for investigation a cinch.
Reverse Image Search
This web site is free to use, and automatically searches uploaded images. It has a drag-and-drop functionality, so we recommend having windows explorer and TinEye.com both open side-by-side in Windows. We recommend keeping four instances of TinEye open in four separate tabs in your preferred web browser. Then, drag and drop each image you wish to check into each instances, Ctrl + Tab’ing between each tab in your browser. Eventually we will gain access to a tool that will permit batch searches, but for now this is the best tool at our disposal.
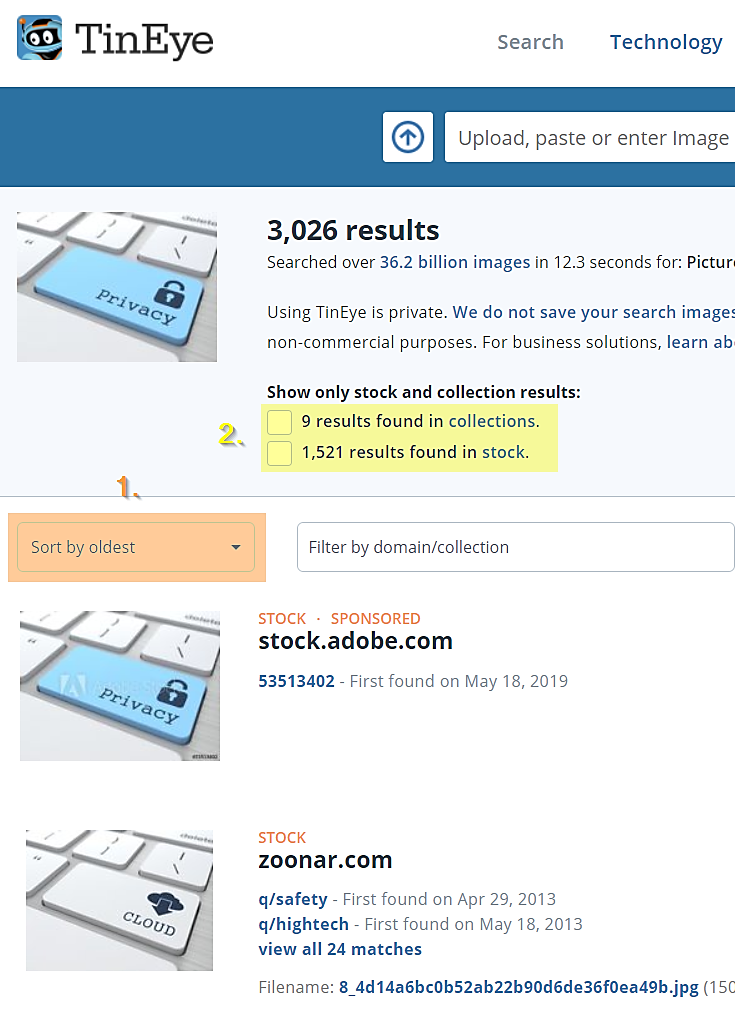
Make sure you select “Sort by oldest” from the drop-down menu after performing your search. This should always be on so the oldest results appear first – giving you a good idea of the image’s source of origination. The results are typically long. There are two special categories within the results to look for.
- “stock” results – If there are any of these in the results, and they match the image in the course, then we recommend replacing the image. As in the above example, if the image in the course looks like someone took the stock image and modified it slightly, then we still recommend replacing it.
- “collection” results – If there are any of these in the results, we have a look at them closely. The two most common ones to look out for are Wikipedia (or Wikimedia) and Flickr. This is because images from both these web sites are often licensed under the Creative Commons. If the source image is made available under such a license, then an attribution caption is needed in the slide or web page just below the image.
- Free, unrestricted repositories – Sometimes sites like Unsplash, Pixabay, Pexels, and others will appear in the results. If the image from the course originates from one of these web sites, it is generally safe to disregard. This is why it is important to familiarize yourself with all of the sites listed on the right side of the CLEAR Usable Works page, so that you can keep an eye out for them in the search results here.
- What is the original source, and are they selling or licensing the image? – Beyond the two initial categories, we usually click through the oldest results in the search to see if we can determine where the image came from and whether or not it is being sold or licensed. Sometimes a photographer or artist will sell or license their work through their own home page. The source web site may be apparent from the search results. If it does not look like they’re selling or licensing their work, an on-the-fly fair use analysis may indicate you are safe to use the image.
If the results from TinEye seem to be incomplete, we recommend doing a second search of the same image via ReverseImageSearch.com utilizing Yandex as its database.