Frequently Asked Questions
Below are commonly asked questions about UNT's online learning management system, Canvas.
If your question can't be answered here, please contact the Faculty Helpdesk at (940) 369-7394, clearhelp@unt.edu, or come and see us during our normal hours in the Support and Services Building 162K.
General
How do I restore a deleted item?
Instructors have the ability to access Canvas's "undelete" page, where they can restore assignments, discussions, quizzes, and other items that were accidentally deleted. To access this page, instructors should go to their course, and then insert "undelete" in the last portion of the URL at the top of their page. An example of this URL is https://unt.instructure.com/courses/12345/undelete.
Will Canvas be unavailable because of maintenance at a consistent time during the
week?
Instructure performs maintenance on the 1st and 3rd Thursday of each month between 1:05am and 3:05am if necessary. Even though the maintenance window is scheduled for 2 hours, users are not likely to experience downtime for more than a few minutes, however users should plan to schedule their activities accordingly.
How do I select my personal pronouns or change my display name in Canvas?
Personal pronouns display after your name in various areas in Canvas, including:
- Comment Fields
- Discussions
- Inbox
- User Navigation Menu
- User Profile Page
- User Settings Page
You can select your personal pronouns by using the following steps:
- In the Global Navigation, click the Account button (above the Dashboard button), then click the Settings link.
- Click the Edit Settings button.
- Enter the name you would like to display in discussions, messages and comments in the Display Name field.
- In the Pronouns drop-down menu, select your personal pronouns.
- Click the Update Settings button
Access
Why can't students see my course?
There could be several different reasons why students cannot see a course or a course's content:
- Either the course or the course content is unpublished. To ensure your course is published, check that the "Published" button on your course's home page in the right Sidebar is green. To ensure your course's content is published, check that the modules, assignments, quizzes, etc. have a green checkmark next to them (Image 1).
- The semester hasn't started yet. Although students are populated one week before the semester start date, students can only access the course content on the first class day unless the course settings have been adjusted to allow them to access it earlier.
- The course is not displaying on the student's Dashboard. For the student to ensure a course can be easily found, they can navigate to All Courses from the Global Navigation bar and click the star to the left of a course to pin it to the Dashboard.
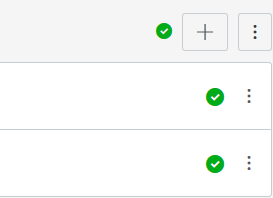
Image 1
How can I give students access to my course before the semester start date?
- Navigate to the course.

Image 2 - From the Course Navigation Bar, click Settings.
- Click the Course Details tab.
- Scroll down and enter the desired "Starts" and "Ends" dates (Image 2).
- Click to checkmark the "Users can only participate in the course between these dates" box.
- Go to the home page and Publish the course.
How can I add a TA or other instructor to an active course?
- Navigate to the course.
- From the Course Navigation Bar, click People.
- Click the green +People button at the top right. A window called "Add People" will appear.
- Under "Add user(s) by," select "Login ID."
- In the text box of the same window, enter the TA's (or TF's, instructor's, etc.) EUID. If you do not know their EUID, select "SIS ID" and enter the person's eight-digit UNT ID number.
- Under "Role," select the role you want the new user to have.
- Click the green Next button at the bottom right of the window.
- The pop-window in Canvas will close, and the user will show in the People page as "Pending."
- This new user will need to log in to Canvas and accept their invitation to the course in order to see it.
I tried to add a user to my course but the +People button is grayed out. What do I
do?
You will no longer have the ability to add users to your course after the end date has been reached. If you would like to add another instructor to your concluded course, you may email the Faculty Helpdesk with the following information:
- Course name and section (ABCD 1234.001)
- Semester (ex. Spring 2019)
- EUID or SIS ID of instructor you would like to add
Note: The request must come from the instructor of note of the course.
A student needs to access course content to finish their incomplete but the semester
is over. What do I do?
Once the end date of a course has been reached, students will no longer have access to a course's content. In order to give a student who needs access to a course's content to finish an incomplete in the course, email the Faculty Helpdesk with the following information:
- Course name and section (ABCD 1234.001)
- Semester (ex. Spring 2019)
- EUID or SIS ID of the student you would like to extend course access for
- Date and time of when they can have access until
Note: The request must come from the instructor of note of the course.
How can I verify that a student submitted a quiz or assignment when there's no submission
in the gradebook?
While there isn't a log of submissions for each student, you can view a record of pages a student has accessed in a student's Access Report:
- Navigate to the course.
- From the Course Navigation Bar, click People.
- Locate the student.
- Click on the three bullet icon to the right of the student's name.
- Select User Details.
- Click Access Report on the far right.
Accessibility
How do I check if my content is accessible on Canvas?
Canvas offers several options for ensuring accessibility, like the Accessibility Checker; this tool analyzes whether written content can be understood by students with visual and auditory impairments.
You may also schedule a consultation with an accessibility specialist by completing a form. Make sure you check the box next to "Accessibility" under the Consultation Categories box.
The CLEAR website is also a knowledgeable resource for anyone seeking to design an accessible course according to UNT's standards.
I want to use a screen reader in Canvas. What browsers are supported?
According to the Canvas Community, Canvas officially supports the following screen reader and browser combinations:
Desktop
- Windows: JAWS and NVDA (latest version for Firefox)
- Macintosh: VoiceOver (latest version for Safari)
- There is no screen reader support for Canvas in Chrome, IE11, or Edge browsers.
Mobile Apps
Official browser support means that these browsers are actively tested against Canvas code. Canvas may be able to be used in any other browser or screen reader not listed, but official support is not provided.
Assignments
How do I create exceptions for due dates?
If a student (or several students) miss a due date or needs an extension, you can allow the student(s) to access an item with a new due date by following the steps below.
- Go to the page of any graded assignment and click on Edit.
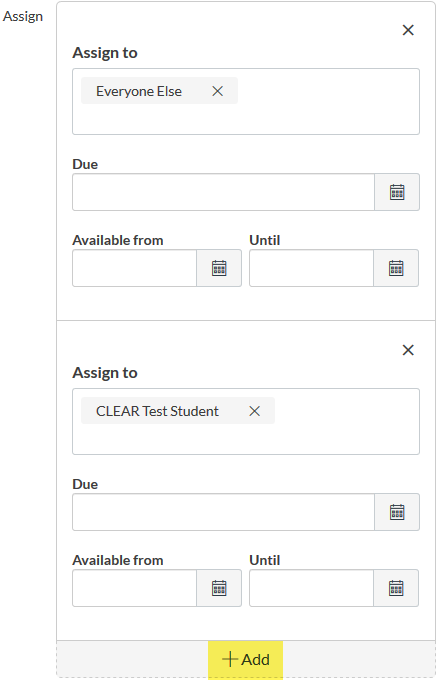
- Scroll down to the "Assign" section of this page. At the base of the "Assign to" box (pictured right), click on +Add; a second "Assign to" box will appear (Image 3).
- In the "Assign to" section of this second box, choose the student(s) or sections who you want to give a different due date. Give them a due date, and choose when you want them to see the assignment by choosing an "Available from," and "Until" date.
- Do not change the first box. The due dates will not conflict.
- You can create as many exceptions as you need by clicking on +Add and repeating the steps above.
- Remember to Save!
I want to embed a YouTube video but I don't want to include the preview image. How
do I remove that?
By default, when Canvas embeds a video in the Rich Text Editor of an assignment (or other content), an inline preview of a video is added. If the video you would like to embed does not have a preview image already set or misrepresents the video, you have the option to remove this preview image. To disable inline previews for videos, follow these instructions:
- Navigate to the course.
- From the Course Navigation Bar, click Assignments.
- Open the relevant assignment.
- Click the Edit button on the top right of the page.
- Make sure the cursor is on the relevant link.
- Click the link icon
 .
. - Check the box next to "Disable inline previews for this link."
- Click the Update Link button.
- Scroll to the bottom of the assignment and click the green Save button.
Communication
If I make an announcement in Canvas, will my students receive an e-mail notification
about it?
That depends! Every Canvas user is responsible for setting up their Notification preferences. If a user does not go into their Canvas account and choose how they want notifications to be sent to their UNT e-mail (or any other contact method they list in Canvas), there are no guarantees for how they will be notified of changes or messages in Canvas. Faculty cannot view or change a student's method for receiving notifications, but they can advise their students to set up notifications early in the semester. Visit the Canvas Guides website for instructions on how to set up student notifications and similar instructions on how to set up instructor notifications.
Canvas has a video explaining notifications. Graphics within Canvas have changed since the video was made, but the video's instructions still apply. Skip to the 2 minute, 30 seconds mark within the video for a Notifications tutorial.
Note: When your students log in to Canvas for the first time, they will be reminded by the system to update their Notifications.
I am worried that students in my course are not receiving my Announcements. How can
I fix this?
 You can tell students about the importance of setting up notifications. You can also
opt to show recent Announcements on your course homepage:
You can tell students about the importance of setting up notifications. You can also
opt to show recent Announcements on your course homepage:
- Navigate to your course.
- From the Course Navigation Bar, click Settings.
- Under the "Course Details" tab, scroll down and click on "more options" at the bottom of the page.
- Check the "Show recent announcements on Course home page" box (Image 4).
- Select the number of announcements shown on the home page.
- Click Update Course Details to save.
How can I get a list of my students' email addresses?
To obtain a list of emails of students enrolled in your course, please follow the steps below:
- Go to “New Analytics” in your course
- Click “Reports”
- Next to “Class Roster,” select “Run Report”
- Select “Run Report” in the pop up windo
You will be prompted to download a CSV file which includes a column for students’ emails.
Course Management
How do I publish my course?

Once your Canvas course has been created, in the Sidebar of the course's home page, click the Publish button (Image 5).
Note: You cannot unpublish a course after students submit assignments in the course.
How do I copy content from a previous Canvas course into a new one?
To copy content from one of your courses into another, follow the steps below:
- Navigate to the course you would like to copy content into.
- If this is a new, blank course, click on "Add existing content" on the homepage.
If this course already contains content, click Settings at the bottom of the Course Navigation Bar and then Import Course Content on the right side of the page. - For “Content Type,” select “Copy A Canvas Course.”
- Select the course you want to copy content from in the “Search for a course” field.
- In the “Content” section, you can copy all content or specified content from the selected course.
- Canvas also gives you the option to shift the dates on the assignments and quizzes in your previous course to accommodate the dates of the course you are copying the content to. If you would like details on how to do this, see the Canvas Community’s guide on date adjustments.
- When you have made your desired selections, click Import.
- If you chose to copy over only “Specific Content” you will now have the option to select the content you would like to copy over by clicking “Select Content.”
- Once the Course Copy is complete, the Course Copy status will show as “Completed."
Can I combine courses or course sections?
Yes! If you want to combine courses or course sections, send an e-mail from your UNT
e-mail to clearhelp@unt.edu with the name(s) of your course(s) and sections along with a request to combine them.
How do I keep an attendance record through Canvas?
The Attendance tool in Canvas allows you to mark students as present, late, or absent from class! To access this,
go to Attendance.
Discussions
How do I enable students to attach files to discussions?
The default setting in Canvas will not allow students to attach files in new discussion topics, discussion replies, and discussions within course groups. There are two places you can enable this setting: either through the "Course Details" tab in Settings or through the Discussions page.
Through Settings:
- Navigate to your course.
- From the Course Navigation Bar, click Settings.
- Scroll down to the bottom of the "Course Details" tab.
- Click on "More options."
- Check the box next to "Let students attach files to discussions."
Through Discussions:
- Navigate to your course.
- From the Course Navigation Bar, click Discussions.
- Click the Settings icon

- Check the box next to "Attach files to discussions."
How do I create a graded group discussion?
Instructors often assign a graded discussion based on student groups. When they grade these discussions in the SpeedGrader, the instructors expect to be able to view the specific posts made by individual students in the group. However, depending on how they set this option up, SpeedGrader will not accommodate this and instead will prompt instructors to view the entire discussion which makes grading very tedious. To ensure the graded discussion is set up correctly, follow these instructions:
Create Groups
First, you will need to establish groups in your course so you can assign discussions to those groups:
- Navigate to your course.
- Click the People tab in the left-hand Course Navigation menu.
- In the top right-hand corner, click the green +Group Set button.
- Give the group set a name like "Project Groups" or Discussion Groups."
- Allow students to sign-up themselves by check-marking the box next to "Allow self sign-up," allow Canvas to automatically split students into groups for you by selecting the first option under "Group Structure" and entering the number of groups, or manually create the groups.
- Click the green Save button at the bottom of the window.
- Depending on the method, the groups will now be created under the "Group Set" tab you just created at the top of the People page.
Note: It is important that you create groups inside of the group set in Canvas. If you do not create groups within a group set, when you assign a discussion or assignment to a group, it will be assigned to students in the group set if they are not assigned to a group - which usually means all student. This will make it difficult to grade individual students.
Now that you have created your groups, you can assign a group discussion:
- Navigate to your course.
- Click the Discussions tab in the left-hand Course Navigation menu.
- In the top right-hand corner, click the green +Discussion button.
- Enter a topic title for the discussion as well as instructions.
- Select the various options based on your preferences.
- Checkmark the "Graded" option.
- A "Group Discussion" box will appear once the "Graded" option is check-marked. Checkmark the box next to "This is a Group Discussion."
- Under the "Group Set" dropdown, select the name of the group set you created earlier.
- Assign the number of points possible and select whether to display the grade as points, percentage, etc. and choose which assignment group this discussion should be in.
- Click the gray Save & Publish button if you are ready to publish.
Once students start to engage with the discussion, you can view each individual student's posts and comments when you access their name in SpeedGrader.
Files
Why can't my students see a file I have uploaded?
A student may not be able to view a file you have uploaded to an assignment or module because the assignment or module are not published, the file itself is not published in the Files link, the folder the file is in is not published, or it is possible that you have set the file to not be visible in student files. Check to make sure the green arrow appears next to the assignment or module, the file, and the file folder.
How do I upload a file to an assignment?
There are a couple of different ways to upload a file in a course and include it in an assignment. The recommended way utilizes the following instructions:
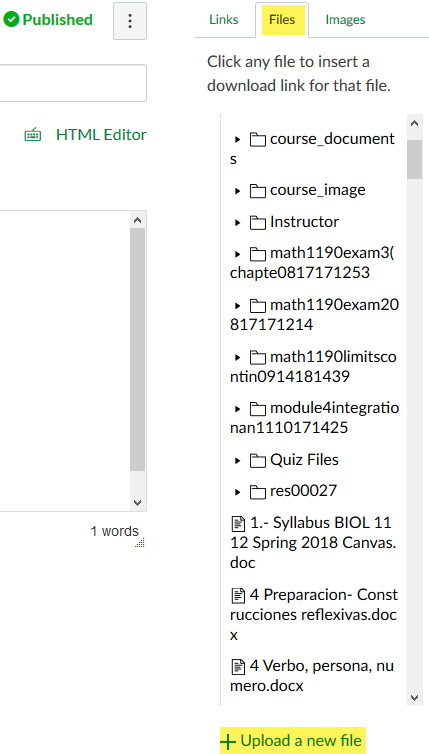 Image 6
- Navigate to your course.
- From the Course Navigation Bar, click Assignments.
- Create a new assignment by clicking the green +Assignment button or edit an assignment you have already created by selecting the assignment name and then clicking the gray Edit button.
- On the right-hand side, click the "Files" tab.
- Upload a new file by clicking on "+Upload a new file" or selecting a file you have already uploaded.
- If you uploaded a new file, make sure to select a folder to upload the file into then click Upload.
- The file will be added in the Rich Text Editor of the assignment as a link.
- Click the green Save button.
This method is recommended as opposed to uploading a file and copying and pasting the file's URL in an assignment. When this method is used, if the course is then copied for a later semester, the file will not be able to be accessed since the file is not located in the new semester's Canvas course. Files can also be uploaded from the Files link in Canvas and then selected from the "Files" tab of the Rich Content Editor when editing an assignment, quiz, etc.
Note: Always make sure that the file and file folder you upload is published if you would like students to view it.
Grades
How do I create a weighted final grade in Canvas?
Similar to Blackboard’s capability to weigh grades within the Grade Center, Canvas offers instructors a simple way to assign values to different assignment types within a course. To take advantage of this feature, follow the Canvas Community’s guide on weighting grades
Weighted grades in Canvas do not occupy a second column; it modifies the total column. These weights can be removed at any time, and added back just as easily.
How do I grade assignments (or, how do I use SpeedGrader)?
Canvas Guides provides information on using Canvas's SpeedGrader and how to use SpeedGrader's markup features.
Can I curve grades in Canvas?
Yes, but it's not recommended. Depending on the class's overall score, curving grades
may send scores down or up at various rates. Curved grades can only be reverted to
previous scores by accessing students' grade histories and then manually editing grades that were curved. If you are interested in curving grades through Excel, you can
export grades from your gradebook into Excel, change and/or curve them, and then upload new scores.
How do I hide grade distribution graphs from students?
By default, students can see a high, low, and median score grade distribution for graded assignments with 5 or more submissions (pictured below).
You can hide this feature from students by following these steps:
- Navigate to your course.
- From the Course Navigation Bar, click Settings.
- Go to the "Course Details" tab.
- Scroll to the bottom and select "more options."
- Check the box next to "Hide grade distribution graphs from students" (Image 7).

Image 7 - Click Update Course Details at the bottom of the page.
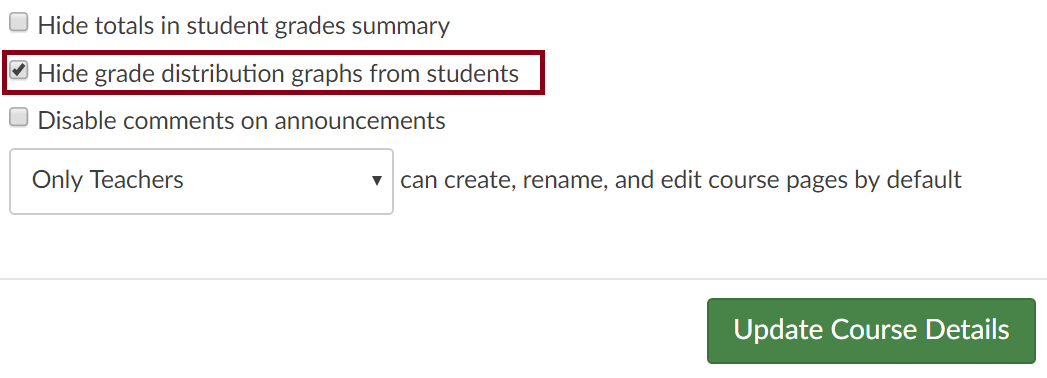
Image 7
Note: Instructors will still be able to view the grade distribution graphs after this option is disabled.
How do I hide the "Totals" column in students' Grades summaries?
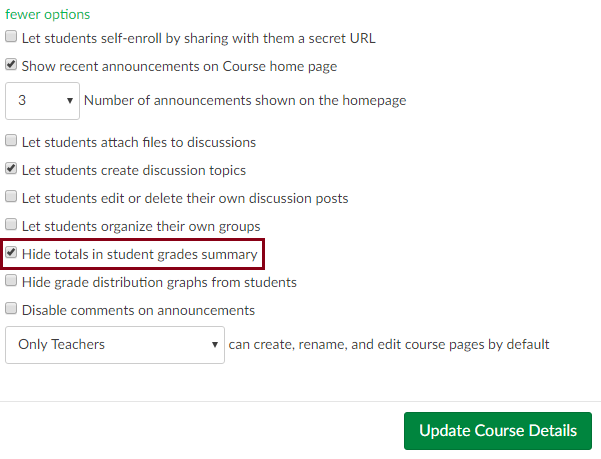
Image 8
You have the ability to hide the "Total" column from students. To do this, follow the steps below:
- Navigate to your course.
- From the Course Navigation Bar, click Settings.
- Click on "Course Details" tab at the top of the page.
- Scroll down to the bottom of this page. Click "more options."
- Check the box for "Hide totals in student grades summary" (Image 8).
- Scroll to the bottom of the page again, and click the green Update Course Details button.
Note: If you hide this column, students will not be able to use the "What If" feature on their "Grades" page. This option allows students to explore what grades they need to earn in upcoming assignments and assessments in order to receive the total course grade they desire.
I want to edit grades offline through Excel. How do I export and import grades in
Canvas?
To export and import grades from a course in Canvas, see the Canvas Community's guide on how to download grades and how to upload grades.
What is the "Treat ungraded as zero" setting? How does it work?
"Treat Ungraded as 0" is a visual change and does not affect any grades. This setting shows the change in Gradebook calculations if ungraded assignments were given scores of zero. Enabling this setting has no effect outside of the Gradebook; students cannot see any difference in their grade pages. When the "Treat Ungraded as 0" setting is enabled, assignments that do not have a grade will be treated as if a student received a score of zero. You can disable this setting in the Gradebook at any time.
Even when this setting is enabled, Canvas will not populate zeros in the Gradebook. Dashes will still display for each student submission. This feature affects the configuration of the Total Column in the Gradebook, which also applies to CSV Exports. The CSV file displays columns for the Current and Final scores: the Current score reflects the total while ignoring unsubmitted assignments (option disabled), and the Final score counts unsubmitted assignments as zero (option enabled).
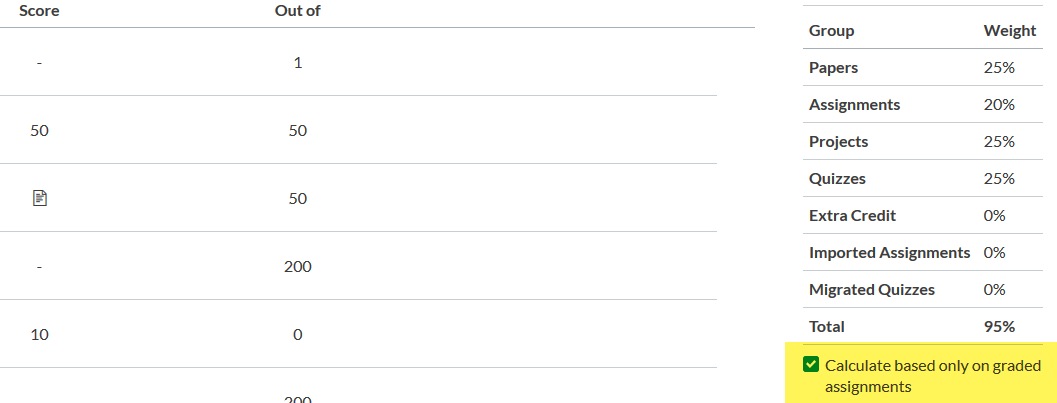 Image 9
On the students' end, if an instructor chooses to "Treat ungraded assignments as zero" in a courses gradebook, students have to manually uncheck a box to not "Calculate only based on graded assignments" (Image 9) to see the same grade total in the course that the instructor sees (to be on the same page as the instructor concerning the grade they are earning in a course). The default on the student side is a check in the box regardless of the setting chosen by the instructor.
What does the dark blue shading in the assignment group columns mean?
If you have set up your assignments into groups and weighed them, you may have noticed
that they appear as columns in the Gradebook. They have a dark blue shading to indicate
that they cannot be deleted or hidden.
I want to add a letter grade. Why is it not reflecting in the Gradebook?
In Canvas, you cannot add a letter grade to a student's assignment in the Gradebook.
You must use the grading scheme which can then convert the grade to a letter according
to the percentages and can be seen in the final grade column.
How do I make the points I assign in a rubric automatically calculate in the Gradebook?
If you are using a rubric to grade an assignment and you would like the points assigned to be calculated in the Gradebook, you will need to checkmark the option in the rubric when you are adding it to the assignment. To do this:
- Navigate to your course.
- From the Course Navigation Bar, click Assignments.
- Click on the assignment you would like to add the rubric to.
- Click the gray +Rubric button.
- Create or find the appropriate rubric.
- Checkmark the box next to "Use this rubric for assignment grading" to ensure that whatever grade is calculated from the points in the rubric in SpeedGrader will automatically be inputted into the Gradebook.
- Click the green Create Rubric button.
If you have already created or added the rubric to an assignment or discussion, you can edit the rubric by clicking the pencil icon that can be found in the top right of the rubric.
Note: To add, view, and make changes to the rubric for discussion assignments, you will need to open the discussion assignment and click on the three vertical dots on the top right. In the dropdown, click "Add Rubric" if you have not already or "Show Rubric" if you already added one.
Pages
How do I create a Wiki Page in Canvas?
When creating a page within Canvas, instructors have the option to open a page to be edited by students (see the Canvas Community's guide on how to create a page under "Edit Page Settings"). Students can then treat the page like a Wiki, and any changes can be undone by an instructor through the page history.
How do I revert page changes?
To view the previous version of a page and/or revert the page back to the way it was in the past, follow instructions on how to manage page history.
Third-Party Integrations
How do I enable Respondus Lockdown Browser for a quiz in Canvas?
To set up a quiz in Canvas that requires students to use LockDown Browser, follow these steps:
- Make sure the quiz has been deployed in the Canvas course.
- From the Course Navigation Bar, select LockDown Browser.
- A list of quizzes in the course will be displayed. Quizzes labeled with “Required” require students to use LockDown Browser. Quizzes labeled with “Not Required” do not require students to use LockDown Browser.
- To change the settings, click the arrow to the left of the quiz title and select the first option, Settings. From here you can either require or no longer require Lockdown Browser for your quiz.
- You may additionally require that LockDown Browser be used to view quiz feedback and results. Other options include creating an access code that students must enter to start the quiz. LockDown Browser will prompt students to enter the instructor-provided code before proceeding with the quiz.
Can I submit a Turnitin assignment on my student's behalf?
No, this capability is not available within Canvas.
What do the Similarity Report icon colors mean?
![]() Image 10
Image 10
When the Plagiarism Framework is enabled on an assignment and after a student has submitted the assignment, either a gray or colored icon will appear in the relevant box in the Gradebook (Image 10). The distinctions are as follows:
- Gray icon [1]: Similarity Report has not been generated yet.
- Color icon [2]: Similarity Report has returned a score; the color is based on the similarity
percentage score:
- If the colored square for your Similarity Report is Red, 75% - 100% of the text in your paper matches something already in the Turnitin database.
- If the colored square is Orange, 50% - 74% of the text in your paper matches something already in the Turnitin database.
- If the colored square is Yellow, 25% - 49% of your paper or assignment matches something already in the Turnitin database.
- If the colored square is Green it means that 0% - 24% of your paper or assignment matches something already in the Turnitin database.
- And a Blue colored square means that less than 20 words in your paper or assignment matches something already in the Turnitin database.
I have never used Respondus before. Where can I find basic instructions?
You can find UNT specific basic Respondus documentation here and on the CLEAR page for Respondus.
My students are reporting that the quiz I created for LockDown Browser is not loading.
What do I do?
LockDown Browser does not cache image or media files and, as a result, Canvas may have difficulty loading the quiz. This issue can be fixed by changing a setting in the Canvas quiz following these instructions:
- Navigate to the course.
- From the Course Navigation Bar, click Quizzes.
- Open the relevant quiz.
- Click the Edit button at the top right of the page.
- Make sure you are under the Details tab.
- In the middle of the page, check-mark the box next to "Show one question at a time."
- Click the green Save button.
This fix will make it easier for Canvas to load the quiz since questions will display one at a time. The problem can worsen if WiFi is being used due to limited bandwidth. If the issue persists, please contact the Faculty Helpdesk through email or 940-369-7394.